Ways to Fancy Up Your Pies
By erinmcdowell • October 19, 2014
Link to post
Decorative Edges
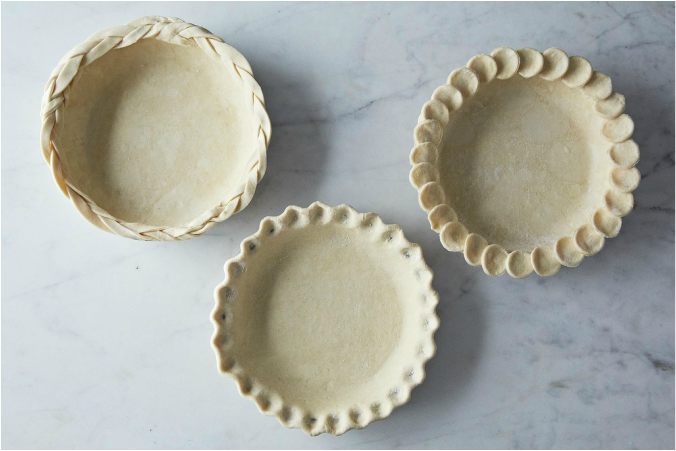
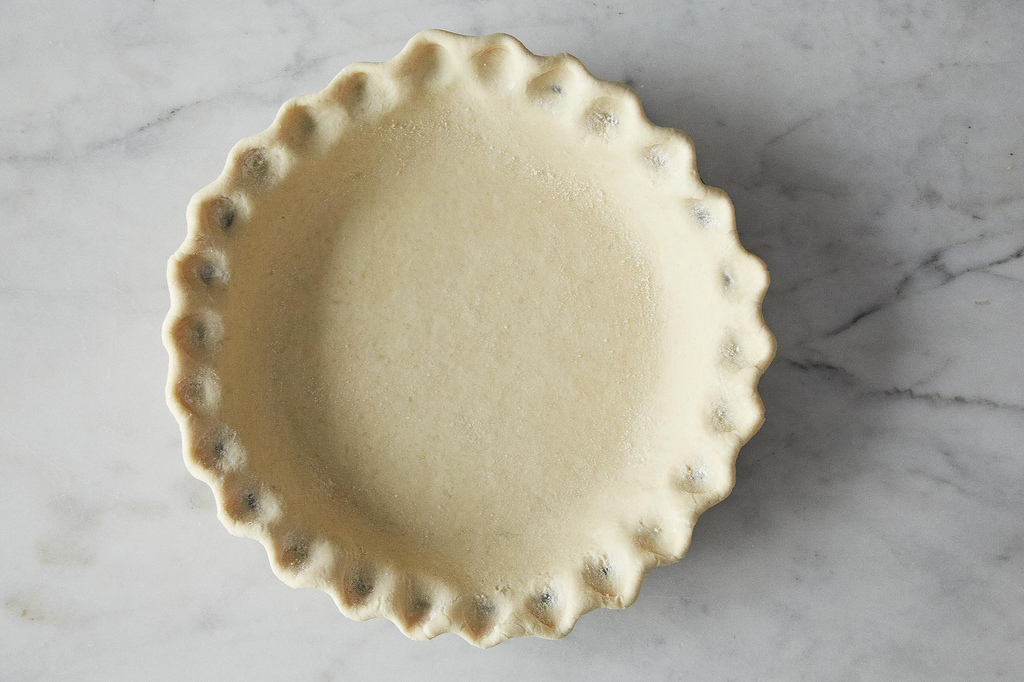
1. Rounded Crimped Edge: You’ve mastered the classic crimped edge, which makes a fluted edge with points. With this new technique, the bowl of a spoon guides the finishing of the edge, making a slightly rounded, more fluid edge. The larger the bowl of the spoon, the bigger the waves will be. Dip the bowl of the spoon lightly into flour and press it gently into the crust, moving outward and using your fingers to guide the outer edge. Repeat all the way around the crust.
By erinmcdowell • October 19, 2014
Link to post
Decorative Edges
1. Rounded Crimped Edge: You’ve mastered the classic crimped edge, which makes a fluted edge with points. With this new technique, the bowl of a spoon guides the finishing of the edge, making a slightly rounded, more fluid edge. The larger the bowl of the spoon, the bigger the waves will be. Dip the bowl of the spoon lightly into flour and press it gently into the crust, moving outward and using your fingers to guide the outer edge. Repeat all the way around the crust.

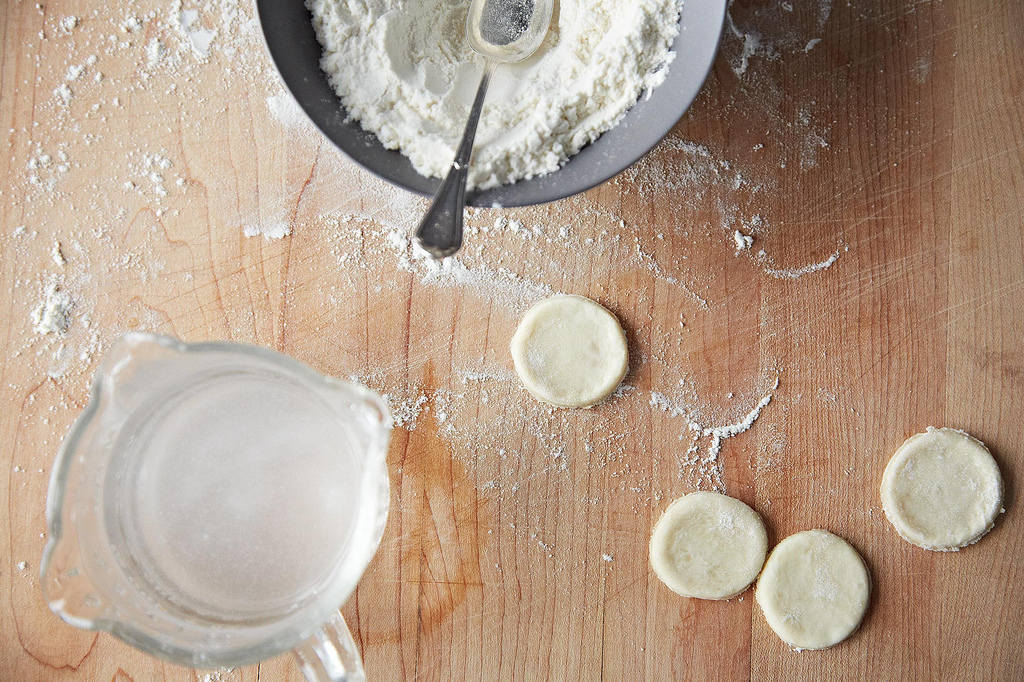
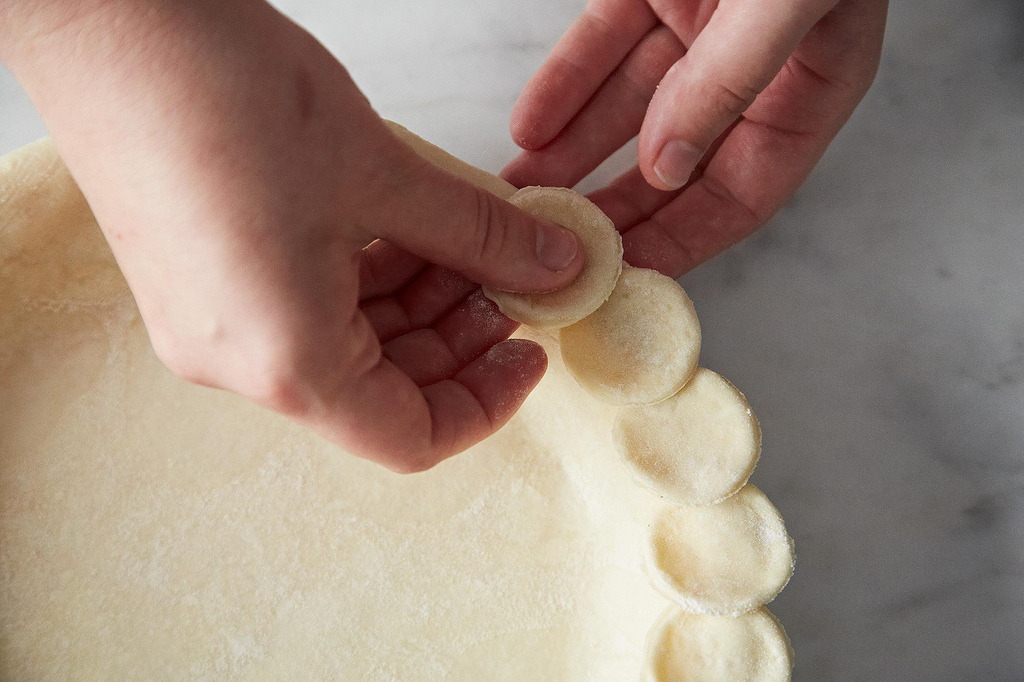
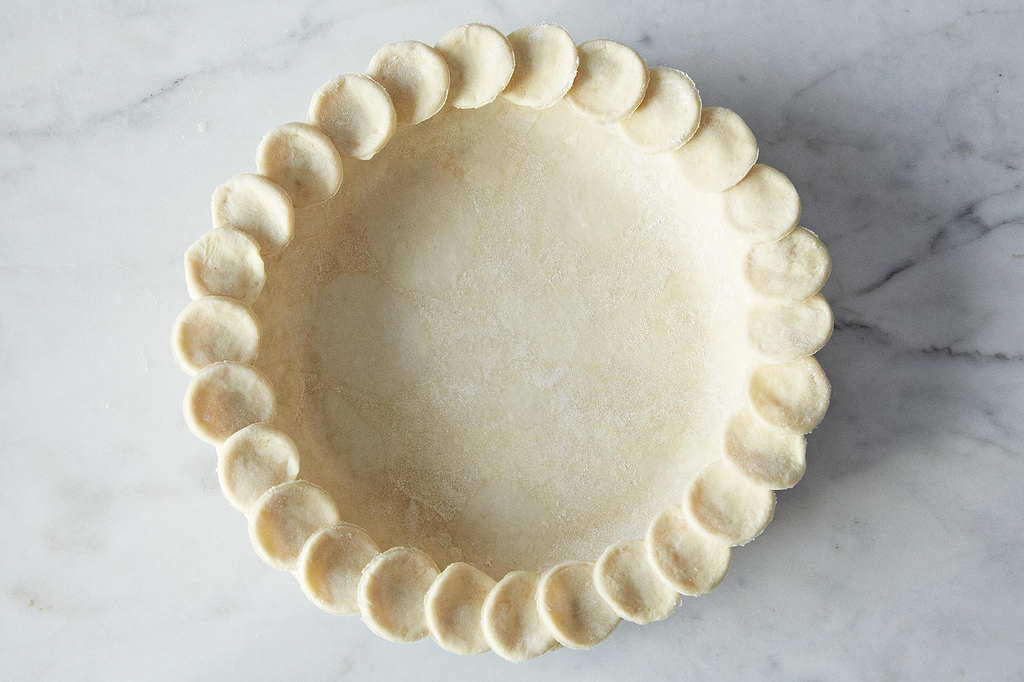
2. Dotted Edge: Roll out pie dough scraps to 1/4-inch thick. Lightly flour a small circular cookie cutter (in a pinch, you can use a shot glass or even a bottle cap), and cut out enough circles to cover the entire edge of the pie.
Brush the edge of the crust with water, and lay the circles around the edge, overlapping slightly. Any shape can be used, just remember to keep the dough pieces small. Pieces that are too large are more likely to become misshapen in the oven.
Brush the edge of the crust with water, and lay the circles around the edge, overlapping slightly. Any shape can be used, just remember to keep the dough pieces small. Pieces that are too large are more likely to become misshapen in the oven.
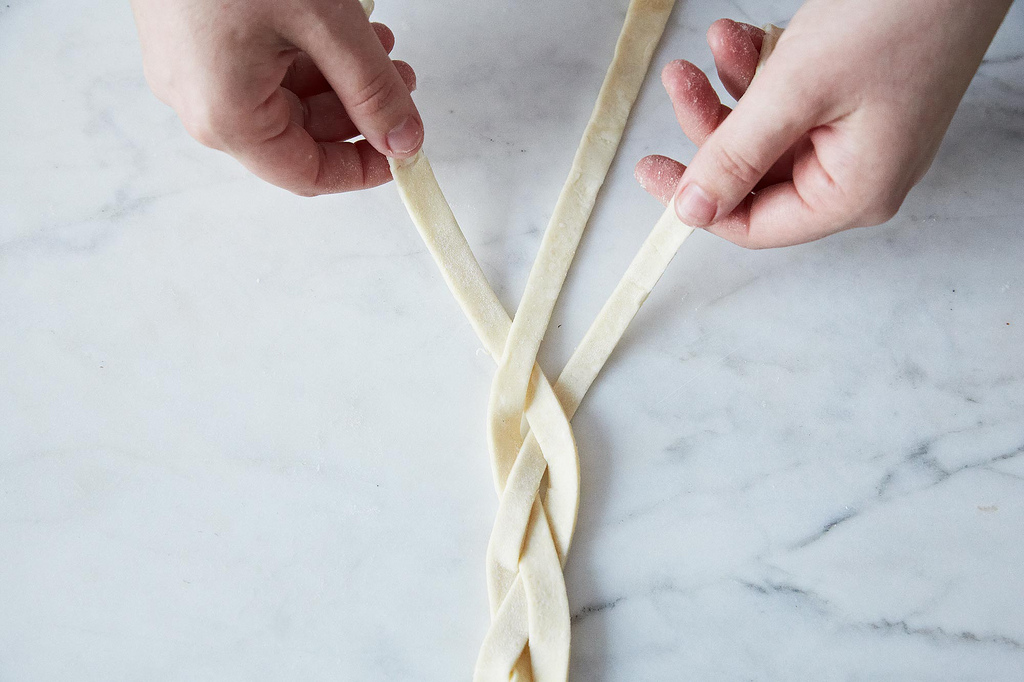
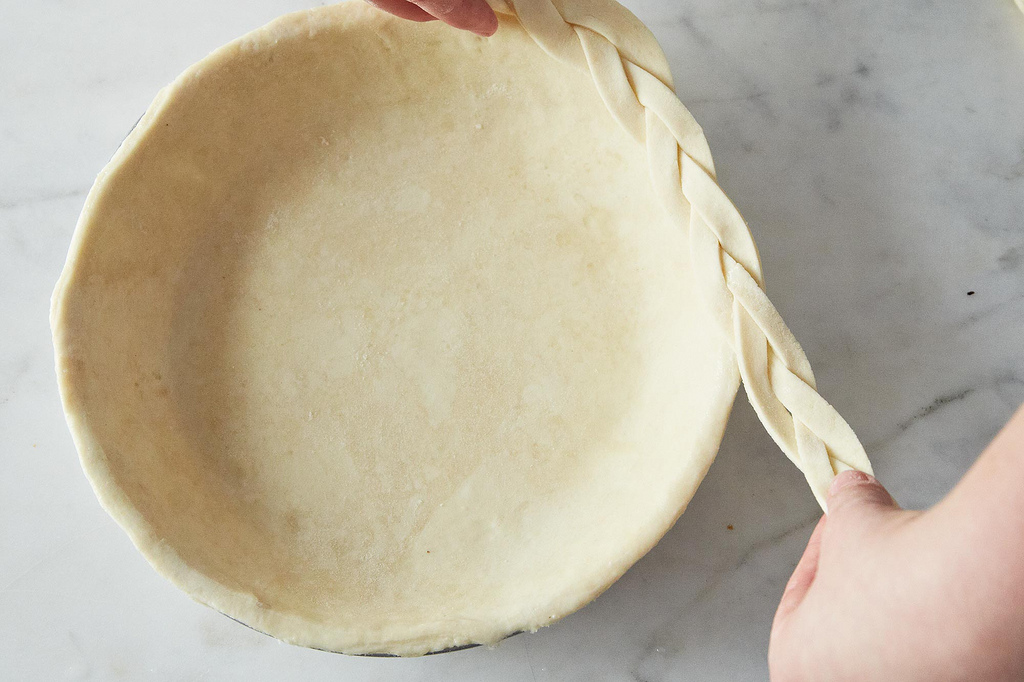
3. Braided Edge: Roll out pie dough scraps to 1/4-inch thick -- it’s best to keep the piece of dough as long as possible. A standard pie 9" pie pan is slightly more than 28 inches in circumference, so either go for it and roll out your dough to be about 29 inches long and make a single braid, or take a more sensible route and roll it out in two 15-inch sections to make two braids. Cut three long, thin strips (about 1/4 inch wide) using a chef’s knife or pastry wheel. Pinch three strips together at the top, and braid together. When the pieces are almost fully braided, pinch the ends together to seal. Hold the strand at both ends and stretch gently. Brush the edge of the crust lightly with water and press the braid (or braids) into the edge (if you made two braids, overlap the pieces slightly to achieve a seamless effect). This technique also works well with just two pieces of dough, twisted together.
4. Cut Out Double Crust Pie: Roll out pie dough to 1/4-inch thick. Cut out shapes from the dough. Working from the outside edge to the center, layer the dough pieces on top of the the pie filling, overlapping slightly. This is a simple and eye catching alternative to a standard double crust pie -- and is far easier than lattice work.
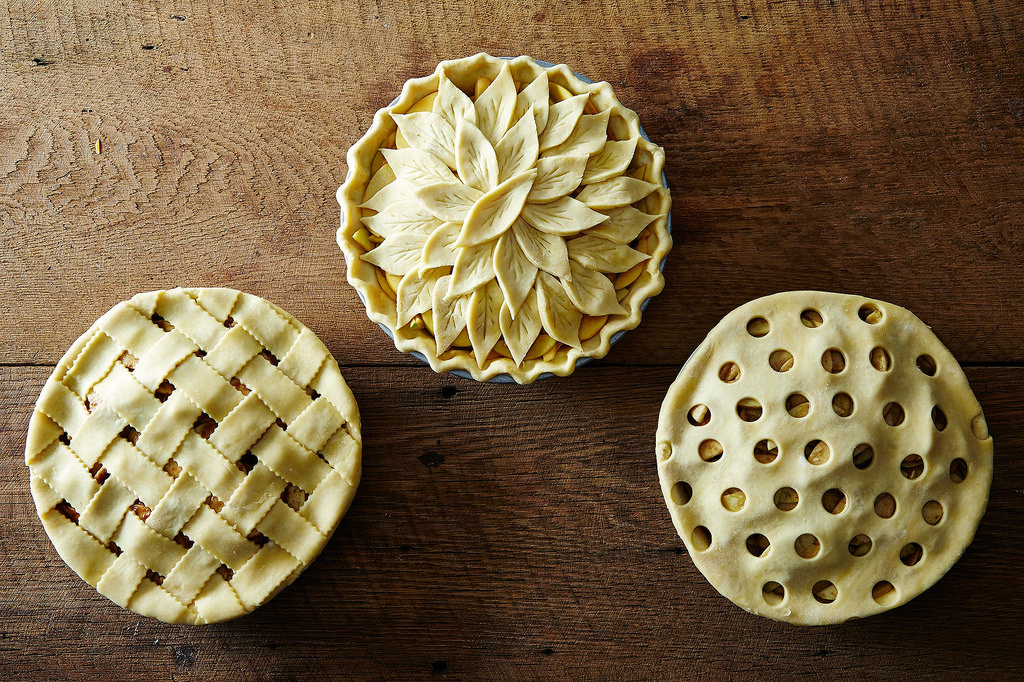
5. Lattice: If you want to tackle lattice, roll out your top crust to 1/4-inch thick. Using a pastry cutter or a sharp knife, cut long, even strips of dough (I like to make mine about 1/2-inch wide). Continue until you're out of dough. Place half of the strips horizontally across your pie filling with a 1/2 inch between each strip. Fold back every other strip halfway, and place a strip vertically down the pie (right up against where you've folded the strips back). Then swap the horizontal strips: unfold the folded ones, and fold back the others. Repeat, placing down another vertical strip, leaving 1/2 inch between each vertical strip, and fold and unfold the horizontal strips in the same way. Repeat, working outwards, until 1/2 of the pie is latticed. Then rotate your pie and do the same on the other half. Trim the edges of the crust.
6. Circles: Roll your top crust to 1/4-inch thick. Using the a pastry tip (substitute with a small cup or round object), cut holes all over the crust. Place the crust on top of the pie and seal the edges.
7. Leaves: Roll your top crust to 1/4-inch thick. Use a real leaf as a guide, or freehand it, to cut out leaf shapes. With a toothpick or skewer, lightly etch a vein design into the top of each leaf. Starting from the outside edge of the pie, layer your leaves (overlapping them slightly) over the pie filling in concentric circles.